本文记录了Asp.Net管道模型和Asp.Net Core的Middleware模型的对比,并在的基础上增加Middleware功能支持。
在演示Middleware功能之前,先要了解一下Asp.Net管道模型发生了什么样的变化。
第一部分:管道模型
1. Asp.Net管道
在之前的Asp.Net里,主要的管道模型流程如下图所示:
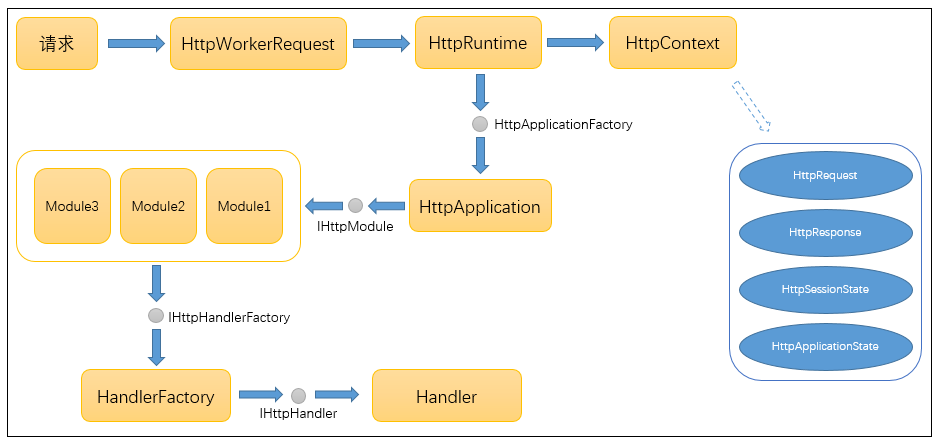
请求进入Asp.Net工作进程后,由进程创建HttpWorkRequest对象,封装此次请求有关的所有信息,然后进入HttpRuntime类进行进一步处理。HttpRuntime通过请求信息创建HttpContext上下文对象,此对象将贯穿整个管道,直到响应结束。同时创建或从应用程序池里初始化一个HttpApplication对象,由此对象开始处理之前注册的多个HttpModule。之后调用HandlerFactory创建Handler处理程序,最终处理此次请求内容,生成响应返回。
下面用一个简单的Asp.Net程序来验证这个流程。
使用VS2015创建一个空的Asp.Net项目,根据向导添加HttpModule.cs、HttpHandler.cs、Global.asax文件


1 using System.Web; 2 3 namespace WebApplicationTest 4 { 5 public class HttpModule1 : IHttpModule 6 { 7 public void Dispose() 8 { 9 10 } 11 12 public void Init(HttpApplication context) 13 { 14 context.BeginRequest += (sender, e) => 15 { 16 context.Response.Write("HttpModule1 request begin...."); 17 }; 18 19 context.EndRequest += (sender, e) => 20 { 21 context.Response.Write("HttpModule1 request end!"); 22 }; 23 } 24 } 25 26 public class HttpModule2 : IHttpModule 27 { 28 public void Dispose() 29 { 30 31 } 32 33 public void Init(HttpApplication context) 34 { 35 context.BeginRequest += (sender, e) => 36 { 37 context.Response.Write("HttpModule2 request begin...."); 38 }; 39 40 context.EndRequest += (sender, e) => 41 { 42 context.Response.Write("HttpModule2 request end!"); 43 }; 44 } 45 } 46 47 public class HttpModule3 : IHttpModule 48 { 49 public void Dispose() 50 { 51 52 } 53 54 public void Init(HttpApplication context) 55 { 56 context.BeginRequest += (sender, e) => 57 { 58 context.Response.Write("HttpModule3 request begin...."); 59 }; 60 61 context.EndRequest += (sender, e) => 62 { 63 context.Response.Write("HttpModule3 request end!"); 64 }; 65 } 66 } 67 } 

1 using System.Web; 2 3 namespace WebApplicationTest 4 { 5 public class HttpHandler : IHttpHandler 6 { 7 public bool IsReusable 8 { 9 get 10 { 11 return true; 12 } 13 } 14 15 public void ProcessRequest(HttpContext context) 16 { 17 context.Response.ContentType = "text/html"; 18 context.Response.Write("Hello world!"); 19 context.Response.End(); 20 } 21 } 22 } 配置Web.Config。以下是在IIS7环境下的配置内容。
1 2 67 8 119 10 12 2213 14 1615 17 2118 19 20
启动调试,访问地址 http://localhost:5383/index.handler ,可以看到页面内容。
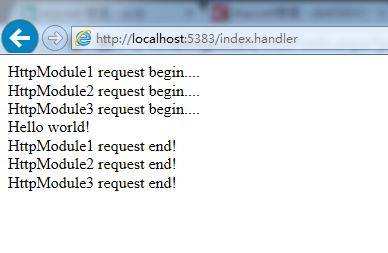
之前版本的Asp.Net MVC正是通过 UrlRoutingModule.cs 类和 MvcHandler.cs 类进行扩展从而实现了MVC框架。
2、Asp.Net Core管道
而在Asp.Net Core里面,管道模型流程发生了很大的变化:
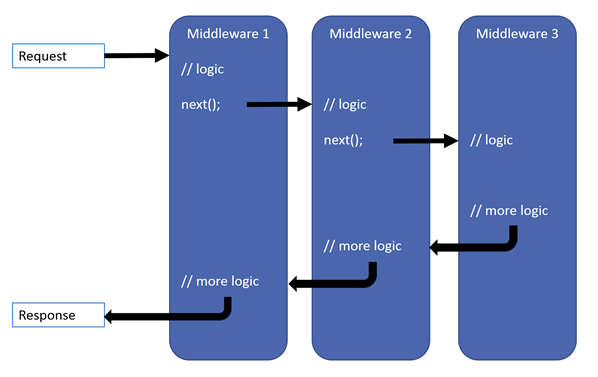
IHttpModule和IHttpHandler不复存在,取而代之的是一个个中间件(Middleware)。
Server将接收到的请求直接向后传递,依次经过每一个中间件进行处理,然后由最后一个中间件处理并生成响应内容后回传,再反向依次经过每个中间件,直到由Server发送出去。
中间件就像一层一层的“滤网”,过滤所有的请求和相应。这一设计非常适用于“请求-响应”这样的场景——消息从管道头流入最后反向流出。
接下来将演示在Asp.Net Core里如何实现中间件功能。
第二部分、Middleware
其实,在这个系列的里面,已经展示了管道的一个简单用法。这里再详细讲解一下如何实现自定义管道。
Middleware支持Run、Use和Map三种方法进行注册,下面将展示每一种方法的使用方式。
一、Run方法
所有需要实现的自定义管道都要在 Startup.cs 的 Configure 方法里添加注册。
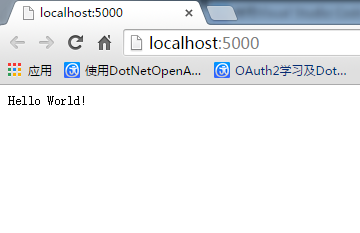
1 public void Configure(IApplicationBuilder app, ILoggerFactory loggerFactory) 2 { 3 // 添加日志支持 4 loggerFactory.AddConsole(); 5 loggerFactory.AddDebug(); 6 7 // 添加NLog日志支持 8 loggerFactory.AddNLog(); 9 10 // 添加自定义中间件 11 app.Run(async context => 12 { 13 await context.Response.WriteAsync("Hello World!"); 14 }); 15 16 // 添加MVC中间件 17 //app.UseMvc(); 18 } 启动调试,访问地址 http://localhost:5000/ ,页面显示Hello World!字样。
再次添加一个Run方法
1 public void Configure(IApplicationBuilder app, ILoggerFactory loggerFactory) 2 { 3 // 添加日志支持 4 loggerFactory.AddConsole(); 5 loggerFactory.AddDebug(); 6 7 // 添加NLog日志支持 8 loggerFactory.AddNLog(); 9 10 // 添加自定义中间件 11 app.Run(async context => 12 { 13 await context.Response.WriteAsync("Hello World!"); 14 }); 15 16 app.Run(async context => 17 { 18 await context.Response.WriteAsync("Hello World too!"); 19 }); 20 21 // 添加MVC中间件 22 //app.UseMvc(); 23 } 启动调试,再次访问发现页面上只有Hello World!字样。
原因是:Run的这种用法表示注册的此中间件为管道内的最后一个中间件,由它处理完请求后直接返回。
二、Use方法
1 public void Configure(IApplicationBuilder app, ILoggerFactory loggerFactory) 2 { 3 // 添加日志支持 4 loggerFactory.AddConsole(); 5 loggerFactory.AddDebug(); 6 7 // 添加NLog日志支持 8 loggerFactory.AddNLog(); 9 10 // 添加自定义中间件 11 app.Use(async (context, next) => 12 { 13 await context.Response.WriteAsync("Hello World!"); 14 }); 15 16 // 添加MVC中间件 17 //app.UseMvc(); 18 } 启动调试,访问页面同样显示Hello World!字样。我们发现使用Use方法替代Run方法,一样可以实现同样的功能。
再次添加一个Use方法,将原来的Use方法内容稍作调整,尝试实现页面显示两个Hello World!字样。
1 public void Configure(IApplicationBuilder app, ILoggerFactory loggerFactory) 2 { 3 // 添加日志支持 4 loggerFactory.AddConsole(); 5 loggerFactory.AddDebug(); 6 7 // 添加NLog日志支持 8 loggerFactory.AddNLog(); 9 10 // 添加自定义中间件 11 app.Use(async (context, next) => 12 { 13 await context.Response.WriteAsync("Hello World!"); 14 await next(); 15 }); 16 17 app.Use(async (context, next) => 18 { 19 await context.Response.WriteAsync("Hello World too!"); 20 }); 21 22 // 添加MVC中间件 23 //app.UseMvc(); 24 } 启动调试,访问页面
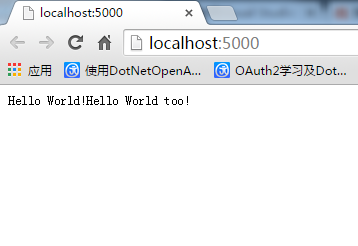
将两个Use方法换个顺序,稍微调整一下内容,再次启动调试,访问页面,发现字样输出顺序也发生了变化。
1 public void Configure(IApplicationBuilder app, ILoggerFactory loggerFactory) 2 { 3 // 添加日志支持 4 loggerFactory.AddConsole(); 5 loggerFactory.AddDebug(); 6 7 // 添加NLog日志支持 8 loggerFactory.AddNLog(); HelloworldMiddleware.cs 9 10 // 添加自定义中间件 11 app.Use(async (context, next) => 12 { 13 await context.Response.WriteAsync("Hello World too!"); 14 await next(); 15 }); 16 17 app.Use(async (context, next) => 18 { 19 await context.Response.WriteAsync("Hello World!"); 20 }); 21 22 // 添加MVC中间件 23 //app.UseMvc(); 24 } 从上面的例子可以发现,通过Use方法注册的中间件,如果不调用next方法,效果等同于Run方法。当调用next方法后,此中间件处理完后将请求传递下去,由后续的中间件继续处理。
当注册中间件顺序不一样时,处理的顺序也不一样,这一点很重要,当注册的自定义中间件数量较多时,需要考虑哪些中间件先处理请求,哪些中间件后处理请求。
另外,我们可以将中间件单独写成独立的类,通过UseMiddleware方法同样可以完成注册。下面将通过独立的中间件类重写上面的演示功能。
新建两个中间件类: HelloworldMiddleware.cs 、 HelloworldTooMiddleware.cs


1 using System.Threading.Tasks; 2 using Microsoft.AspNetCore.Http; 3 4 namespace WebApiFrame.Core.Middlewares 5 { 6 public class HelloworldMiddleware 7 { 8 private readonly RequestDelegate _next; 9 10 public HelloworldMiddleware(RequestDelegate next){ 11 _next = next; 12 } 13 14 public async Task Invoke(HttpContext context){ 15 await context.Response.WriteAsync("Hello World!"); 16 await _next(context); 17 } 18 } 19 } 

1 using System.Threading.Tasks; 2 using Microsoft.AspNetCore.Http; 3 4 namespace WebApiFrame.Core.Middlewares 5 { 6 public class HelloworldTooMiddleware 7 { 8 private readonly RequestDelegate _next; 9 10 public HelloworldTooMiddleware(RequestDelegate next){ 11 _next = next; 12 } 13 14 public async Task Invoke(HttpContext context){ 15 await context.Response.WriteAsync("Hello World too!"); 16 } 17 } 18 } 修改 Startup.cs 的Configure方法内容
1 public void Configure(IApplicationBuilder app, ILoggerFactory loggerFactory) 2 { 3 // 添加日志支持 4 loggerFactory.AddConsole(); 5 loggerFactory.AddDebug(); 6 7 // 添加NLog日志支持 8 loggerFactory.AddNLog(); 9 10 // 添加自定义中间件 11 app.UseMiddleware (); 12 app.UseMiddleware (); 13 14 // 添加MVC中间件 15 //app.UseMvc(); 16 } 启动调试,访问页面,可以看到同样的效果。
三、Map方法
Map方法主要通过请求路径和其他自定义条件过滤来指定注册的中间件,看起来更像一个路由。
修改 Startup.cs 的Configure方法内容,增加静态方法MapTest
1 public void Configure(IApplicationBuilder app, ILoggerFactory loggerFactory) 2 { 3 // 添加日志支持 4 loggerFactory.AddConsole(); 5 loggerFactory.AddDebug(); 6 7 // 添加NLog日志支持 8 loggerFactory.AddNLog(); 9 10 // 添加自定义中间件 11 app.Map("/test", MapTest); 12 13 // 添加MVC中间件 14 //app.UseMvc(); 15 } 16 17 private static void MapTest(IApplicationBuilder app){ 18 app.Run(async context => { 19 await context.Response.WriteAsync("Url is " + context.Request.PathBase.ToString()); 20 }); 21 } 启动调试,访问路径 http://localhost:5000/test ,页面显示如下内容
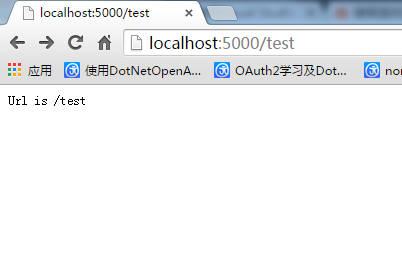
但是访问其他路径时,页面没有内容显示。从这个可以看到,Map方法通过类似路由的机制,将特定的Url地址请求引导到固定的方法里,由特定的中间件处理。
另外,Map方法还可以实现多级Url“路由”,其实就是Map方法的嵌套使用
1 // 添加自定义中间件 2 app.Map("/level1", lv1App => { 3 app.Map("/level1.1", lv11App => { 4 // /level1/level1.1 5 6 }); 7 8 app.Map("/level1.2", lv12App => { 9 // /level1/level1.2 10 11 }); 12 }); 也可以通过MapWhen方法使用自定义条件进行“路由”
1 public void Configure(IApplicationBuilder app, ILoggerFactory loggerFactory) 2 { 3 // 添加日志支持 4 loggerFactory.AddConsole(); 5 loggerFactory.AddDebug(); 6 7 // 添加NLog日志支持 8 loggerFactory.AddNLog(); 9 10 // 添加自定义中间件 11 app.MapWhen(context => 12 { 13 return context.Request.Query.ContainsKey("a"); 14 }, MapTest); 15 16 // 添加MVC中间件 17 //app.UseMvc(); 18 } 19 20 private static void MapTest(IApplicationBuilder app) 21 { 22 app.Run(async context => 23 { 24 await context.Response.WriteAsync($"Url is {context.Request.Path.ToString()}{context.Request.QueryString.Value}"); 25 }); 26 27 } 启动调试,访问路径 http://localhost:5000/path?a=1&b=2 ,页面显示如下内容
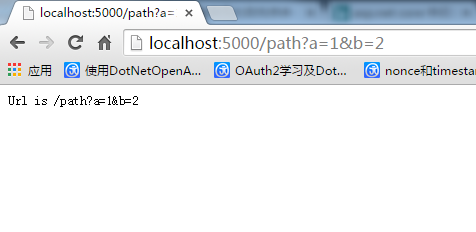
只有当请求参数中含有a时,页面才正常显示内容。
四、其他内置的中间件
Asp.Net Core框架内置了几个中间件

最后,用自定义中间件实现一个简单的访问日志记录功能,记录每一次请求的内容和响应时间。
1. 添加日志模型 VisitLog.cs
1 using System; 2 using System.Collections.Generic; 3 using System.Linq; 4 5 namespace WebApiFrame.Models 6 { 7 public class VisitLog 8 { 9 public string Url { get; set; } 10 11 public IDictionary Headers { get; set; } = new Dictionary (); 12 13 public string Method { get; set; } 14 15 public string RequestBody { get; set; } 16 17 public DateTime ExcuteStartTime { get; set; } 18 19 public DateTime ExcuteEndTime { get; set; } 20 21 public override string ToString() 22 { 23 string headers = "[" + string.Join(",", this.Headers.Select(i => "{ " + $"\"{i.Key}\":\"{i.Value}\"" + "}")) + "]"; 24 return $"Url: {this.Url},\r\nHeaders: {headers},\r\nMethod: {this.Method},\r\nRequestBody: {this.RequestBody},\r\nExcuteStartTime: {this.ExcuteStartTime.ToString("yyyy-MM-dd HH:mm:ss.fff")},\r\nExcuteStartTime: {this.ExcuteEndTime.ToString("yyyy-MM-dd HH:mm:ss.fff")}"; 25 } 26 } 27 } 2. 添加访问日志记录中间件 VisitLogMiddleware.cs ,同时添加UseVisitLogger扩展方法。
1 using Microsoft.AspNetCore.Builder; 2 using Microsoft.AspNetCore.Http; 3 using Microsoft.Extensions.Logging; 4 using System; 5 using System.IO; 6 using System.Linq; 7 using System.Threading.Tasks; 8 using WebApiFrame.Models; 9 10 namespace WebApiFrame.Core.Middlewares 11 { 12 public class VisitLogMiddleware 13 { 14 private readonly RequestDelegate _next; 15 16 private readonly ILogger logger; 17 18 private VisitLog visitLog; 19 20 public VisitLogMiddleware(RequestDelegate next, ILoggerFactory loggerFactory) 21 { 22 _next = next; 23 logger = loggerFactory.CreateLogger (); 24 } 25 26 public async Task Invoke(HttpContext context) 27 { 28 visitLog = new VisitLog(); 29 HttpRequest request = context.Request; 30 visitLog.Url = request.Path.ToString(); 31 visitLog.Headers = request.Headers.ToDictionary(k => k.Key, v => string.Join(";", v.Value.ToList())); 32 visitLog.Method = request.Method; 33 visitLog.ExcuteStartTime = DateTime.Now; 34 35 using (StreamReader reader = new StreamReader(request.Body)) 36 { 37 visitLog.RequestBody = reader.ReadToEnd(); 38 } 39 40 context.Response.OnCompleted(ResponseCompletedCallback, context); 41 await _next(context); 42 } 43 44 private Task ResponseCompletedCallback(object obj) 45 { 46 visitLog.ExcuteEndTime = DateTime.Now; 47 logger.LogInformation($"VisitLog: {visitLog.ToString()}"); 48 return Task.FromResult(0); 49 } 50 } 51 52 public static class VisitLogMiddlewareExtensions 53 { 54 public static IApplicationBuilder UseVisitLogger(this IApplicationBuilder builder) 55 { 56 return builder.UseMiddleware (); 57 } 58 } 59 } 3. 在 Startup.cs 添加中间件支持
1 public void Configure(IApplicationBuilder app, ILoggerFactory loggerFactory) 2 { 3 // 添加日志支持 4 loggerFactory.AddConsole(); 5 loggerFactory.AddDebug(); 6 7 // 添加NLog日志支持 8 loggerFactory.AddNLog(); 9 10 // 添加自定义中间件 11 app.UseVisitLogger(); 12 13 app.Run(async context => 14 { 15 await context.Response.WriteAsync("Hello World!"); 16 }); 17 18 19 // 添加MVC中间件 20 //app.UseMvc(); 21 } 4. 启动调试,访问地址 http://localhost:5000/ ,查看调试控制台日志打印信息。

另外,如果你比较细心会发现,在Configure方法里有这样一句代码: app.UseMvc(); ,Asp.Net Core Mvc正是通过这个方法借用中间件来扩展实现了MVC框架。